1. Home
  2. Docs
  3. Llamachant Framework Modules
  4. Additional Modules
  5. Workflow Module

Workflow Module

This module allows you to create workflows that send emails, sends reports, and invokes methods on objects. This can be one on a schedule basis, once per object, when certain objects meet criteria, or after an action is performed on the client side.

Getting Started

  1. Install the LlamachantFramework.Workflow from nuget into your solution
  2. Include the LlamachantFrameworkWorkflowModule in the RequiredModuleTypes collection of your .Module project
  3. Consider calling the TemplateFormattingFactory.SetDefaultFormattingType method to support complex HTML email templates
				
					public override void Setup(XafApplication application) {
            base.Setup(application);
            this.RequiredModuleTypes.Add(typeof(LlamachantFrameworkWorkflowModule));
            TemplateFormattingFactory.SetDefaultFormattingType(TemplateFormattingFactory.TemplateFormattingType.DoubleBrace);
}


Setting up the Workflow Email Settings

The Workflow Email Settings enable the workflow service engine to send email by providing SMTP information. You can use the default Workflow Email Settings or use your own email settings by implementing a class that implements the IWorkflowEmailService interface.

Workflow Email Templates

Create useful email templates and embed data from your objects directly into the subject and body. The simple example below includes the FirstName field from the Client object. You can also include a chain of properties such as {Address.State.Name}. All emails are sent as HTML.

Workflow Definitions

It’s important to setup your workflow definitions carefully. A definition that is setup incorrectly could have consequences (such as over-emailing or incorrectly editing data). Ensure you have filled in all appropriate details before activating the workflow.

Creating a Workflow Definition

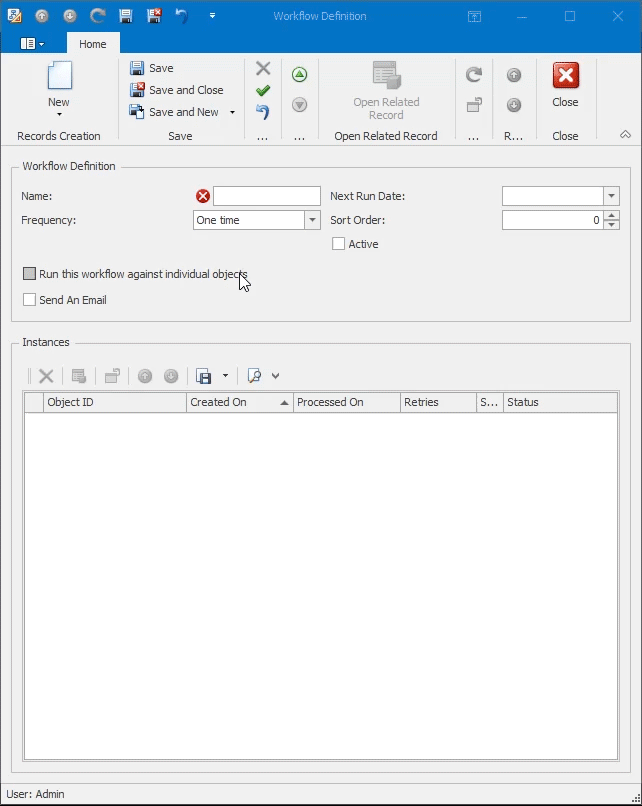
Specify a name, frequency, interval (if required) and then select the actions the workflow should take. The Frequency determines when the workflow should be evaluated next. If it’s time based (Minutes, Hourly, Daily, Weekly, Monthly) then the Interval field will be available. Specify the number of minutes, hours, etc. before the workflow should be run again. Once run, the Next Run Date will be set to the next interval. If the workflow is setup as One Time, it will be evaluated and run once for each targeted object. There are 2 other frequencies that can be selected, On action executed and Always. The On action executed option will allow a workflow instance to be created and processed when a user executes an action. You can use a pre-defined action or include a caption for your action and a new Workflow action will be added automatically for the user to select. Finally, the Always option is evaluated on every iteration of the workflow service (30 seconds by default). Once an object meets certain criteria, it will be evaluated and you should plan to affect the object so it no longer meets the criteria on the next iteration.

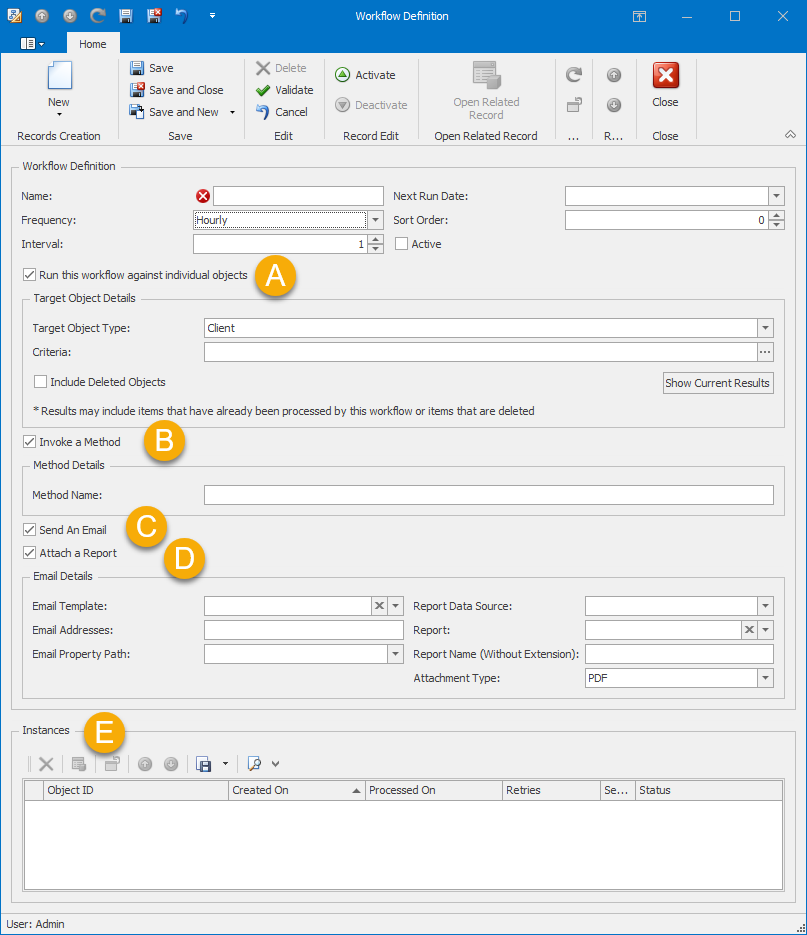
A – Run this workflow against individual objects

This option allows you to specify a Target Object Type and provide some criteria that the object must match in order to be considered when evaluating the workflow. Use the Show Current Results to see all items that can be run with the workflow. Note that depending on the frequency, you may see more items listed than what will actually be processed. This is because the workflow server checks to see if the workflow has been run against an object previously before processing it again.

B – Invoke a Method

You can invoke a method on your business object. Specify the method name that should be called. Please note that your method cannot contain any parameters. You can optionally return a bool value which will be considered during the workflow evaluation. If a false value is returned, the workflow is cancelled and will be re-evaluated on the next iteration. If any other return type is provided, the value is ignored.

C – Send an Email

Select an Email Template to send to the recipient. If a Target Object Type is selected, the current object being evaluated will be used as a data source for the email template. Next, provide a static email address or the Email Property Path within the target object. We recommend including criteria to load objects with an email address already specified to limit the amount of objects being processed by the workflow server.

D – Attach a Report

Along with your email, you can optionally send a report. This report is exported and attached as a PDF or Excel document (xls or xlsx). Select a report and, if necessary, select a Report Data Source. This is a property within your business object that should be used as the report data source. Finally, specify a report name without extension. The extension will automatically be applied to the end of the report name. You can include a property place holder in the report name if desired (Example: Invoice for {LastName} )

E – Instances

Once your workflow has been Activated, instances will be displayed in the grid below. This will display the status and/or any errors that may have occurred with a workflow instance.

Sample Scenarios

Welcome Email

When you only ever want to run a workflow on an object once, select the One Time frequency in the definition. Select a Target Object Type and apply criteria as required. Once a Workflow Instance has been created for an object, it will not be evaluated again.

Send a Report on a schedule

Select the time-based frequency and interval you want to send the report on. Set the Next Run Date to when you want the first report to be sent. Select Send an Email and then Attach a Report. Fill in the options for your email and your report. Note that the Report Data Source option is not available for scheduled reports because they are not run on a particular object. Instead, the report’s data source will be used as if you were running it from the Reports module of your application. It is recommended that you remove all parameters from your report or provide default values as the workflow service is incapable of setting parameters.

Update an Object

When an object sits in a current state, it often makes sense to move it into a new state. You can use the State Machine module provided by DevExpress if you want the user to work with these states within the UI. In many cases, we implement our own pre-defined states without using this module using controllers and actions instead. If you want the workflow service to change the state for you, setup a new workflow definition and set the Frequency to Always. Select Run this workflow against individual objects and provide criteria that identified an object as being in that state. Select Invoke a Method and enter the method on your business object that will move your object from its current state into a new state. If desired, you can send an email and report as well if it’s appropriate.

Run a workflow when an action is clicked

When setting up your workflow, set the Frequency to On action executed and fill in the Action Name. If you enter the full path of a controller’s public action property (Example: YourSolution.Module.Controllers.MyController.MyAction), then the workflow will trigger any time a user clicks the action. However, if you just enter a simple name, that name will be an option in a workflow Single Choice Action.

Using your own Email Service

You can handle sending emails and attachments yourself by creating your own IWorkflowEmailService class. This class should be provided to the WorkflowEmailSettingsController as well as the WorkflowService.Instance (from the Workflow Engine module).

The code below shows how to implement this class and provide it to the WorkflowEmailSettingsController.

				
					public class DummyEmailService : IWorkflowEmailService
    {
        public byte[] GetExportedReport(XafApplication application, WorkflowInstance instance, object objectoid, IObjectSpace space, WorkflowDefinition.ReportAttachmentType reporttype)
        {
            return new byte[0]; //return a report export here
        }

        public void SendEmail(IObjectSpace space, string emailto, string subject, string body, byte[] attachmentdata, string reportname)
        {

        }
    }


					public class CustomWorkflowEmailSettingsController : ObjectViewController<DetailView, WorkflowEmailSettings>
    {
        protected override void OnActivated()
        {
            base.OnActivated();
            Frame.GetController<LlamachantFramework.Workflow.Controllers.WorkflowEmailSettingsController>().GetEmailService += CustomWorkflowEmailSettingsController_GetEmailService;           
        }

        protected override void OnDeactivated()
        {
            Frame.GetController<LlamachantFramework.Workflow.Controllers.WorkflowEmailSettingsController>().GetEmailService -= CustomWorkflowEmailSettingsController_GetEmailService;
            base.OnDeactivated();
        }

        private void CustomWorkflowEmailSettingsController_GetEmailService(object sender, LlamachantFramework.Workflow.Controllers.WorkflowEmailServiceEventArgs e)
        {
            e.EmailService = new DummyEmailService();
        }
    }


Extending our Email Service

				
					public class ExtendedEmailService : WorkflowEmailService
    {
        public override void SendEmail(IObjectSpace space, string emailto, string subject, string body, byte[] attachmentdata, string reportname)
        {
            base.SendEmail(space, emailto, subject, body, attachmentdata, reportname);
        }
    }
				
			
Was this article helpful to you? Yes 8 No

How can we help?